


Stroms Grip-Guide. Measure yourself. Eng
Here are instructions in English PDF
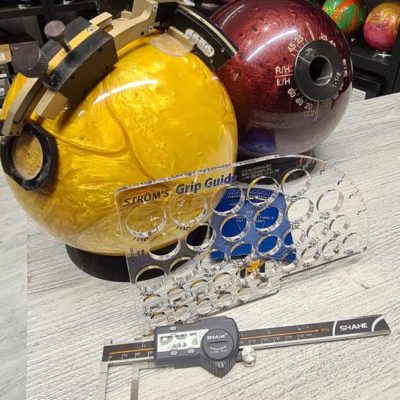
This is how you measure your hand to get the ball drilled to you. Stroms Grip-Guide can be purchased here or borrowed for free. I will send one to you and you will receive a pre-stamped envelope so you can send it back free of charge.
Simple and short user manual for those without prior knowledge. Make a movie like this and send in so we can drill your bowlingball. More details with pictures and explanatory text, see the long operating instructions.
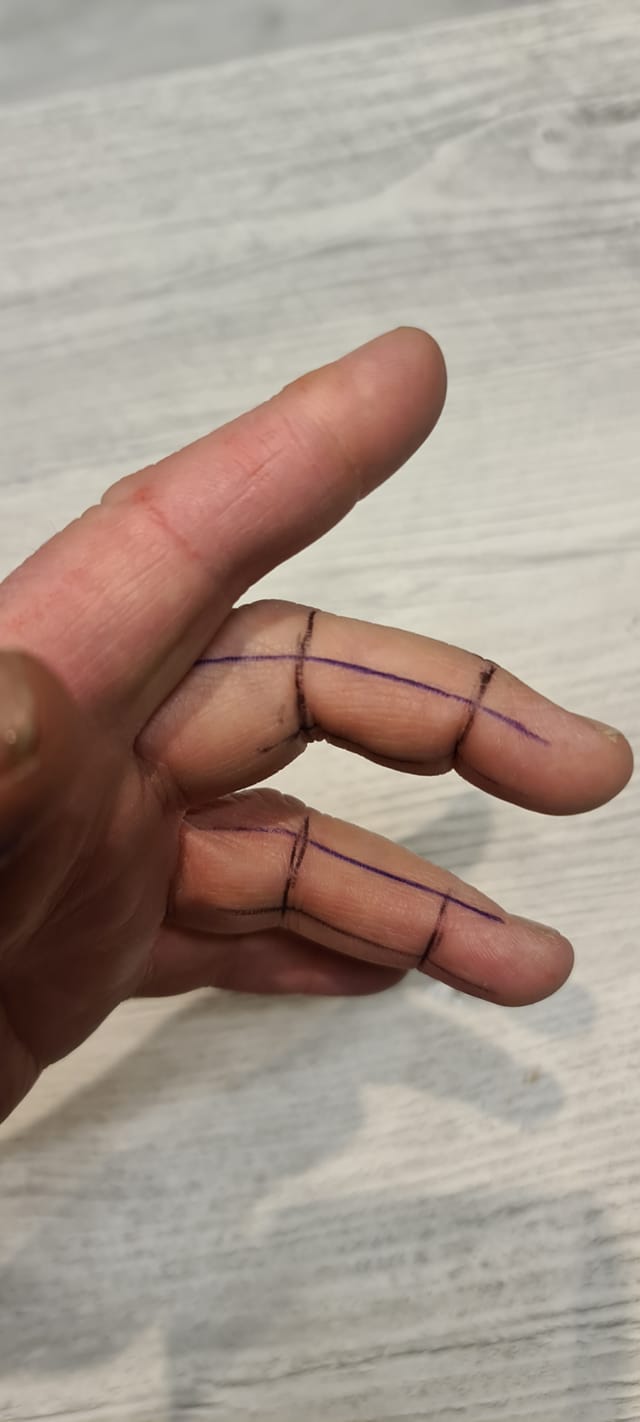
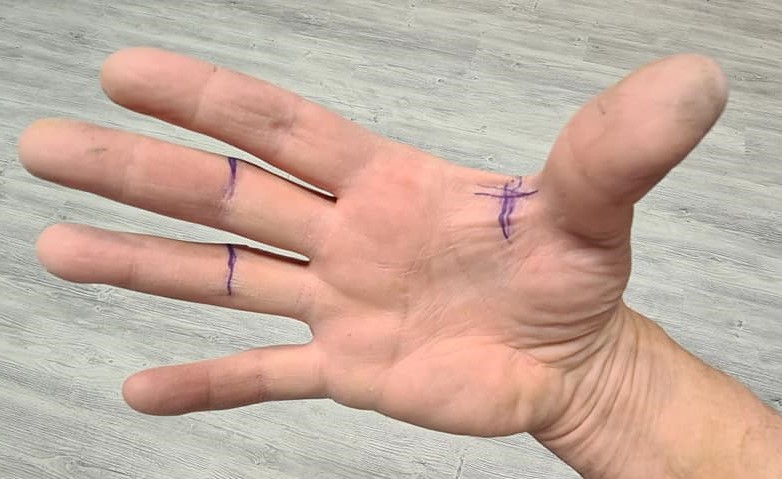
A. Draw a line on the long and ring finger. Draw on the first joint for fingertips or the second joint for conventional grip.
B. Film with your phone as you fold in and extend your fingers as much as possible. This is to be able to determine the flexibility of your fingers. Continue filming all the steps so you do not have to think about writing down the measurements. Everything is visible on the film.
C. The right size of long and ring finger is when you can easily without resistance get each finger down to the line.
D. The right size of thumb is the size you get in the thumb without resistance.
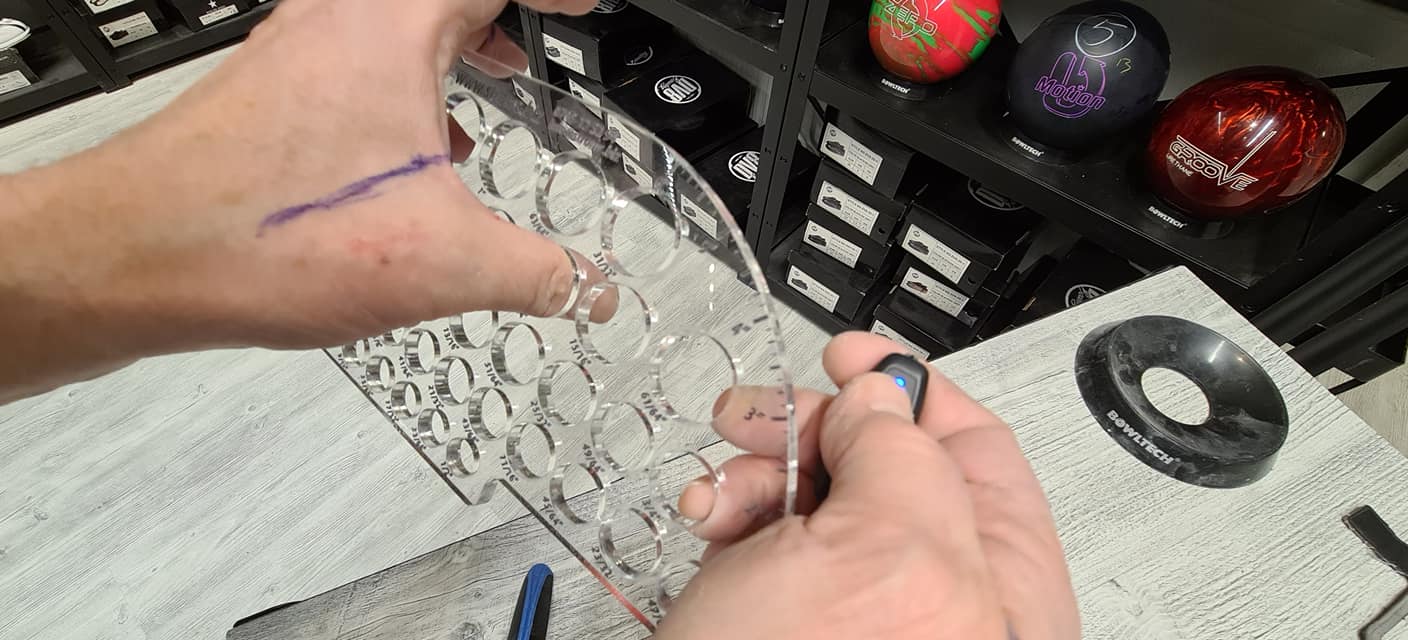
E. Measure the length from the innermost part of the thumb crease and when you place your fingers along the curved part of the Grip-Guide where the red measuring lines are located. The thumb should be along the straight edge, the fingers and hand should be in contact with the rounded part of the Grip-Guide when the fingers are extended. Place the green bar on the Grip-Guide at the bottom of the thumb crease. Feel free to draw a cross inside the thumb crease to make it easier to aim with the green line and measure the length of the fingers along the red scale.
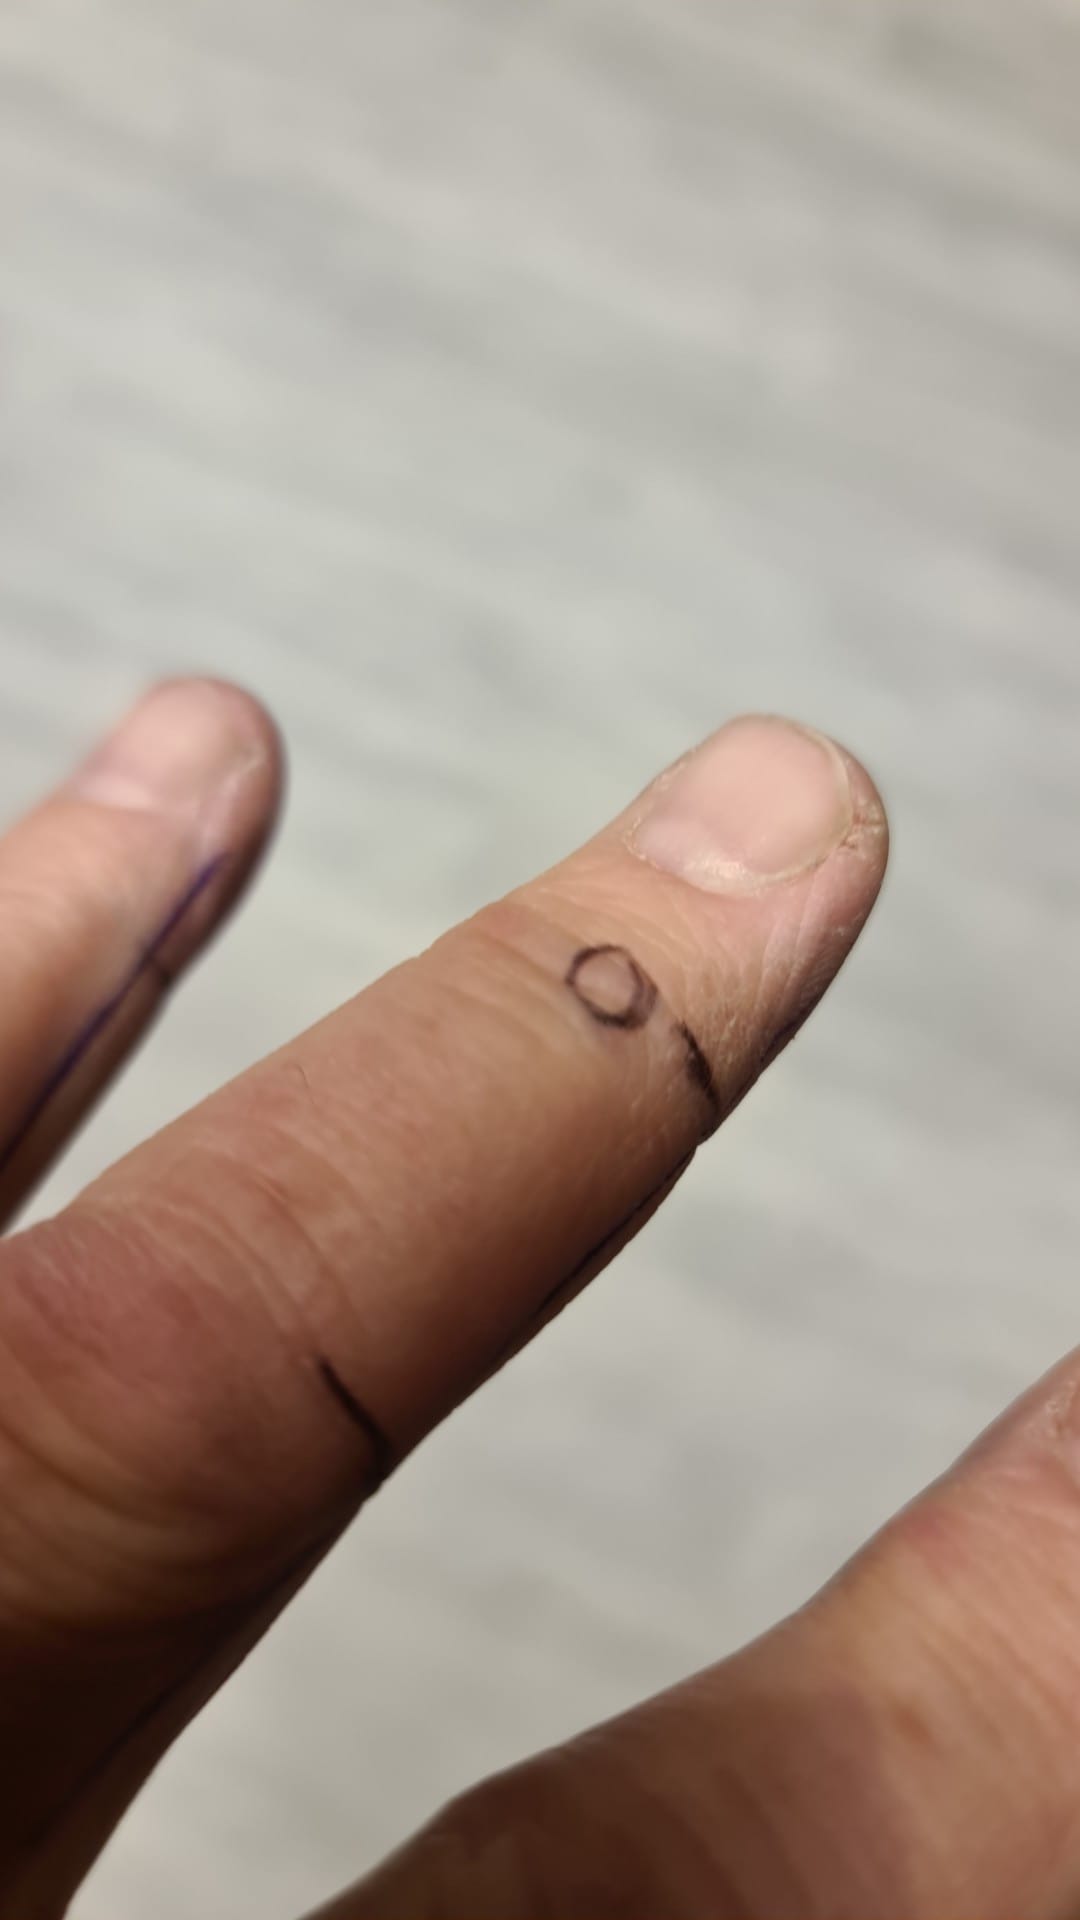
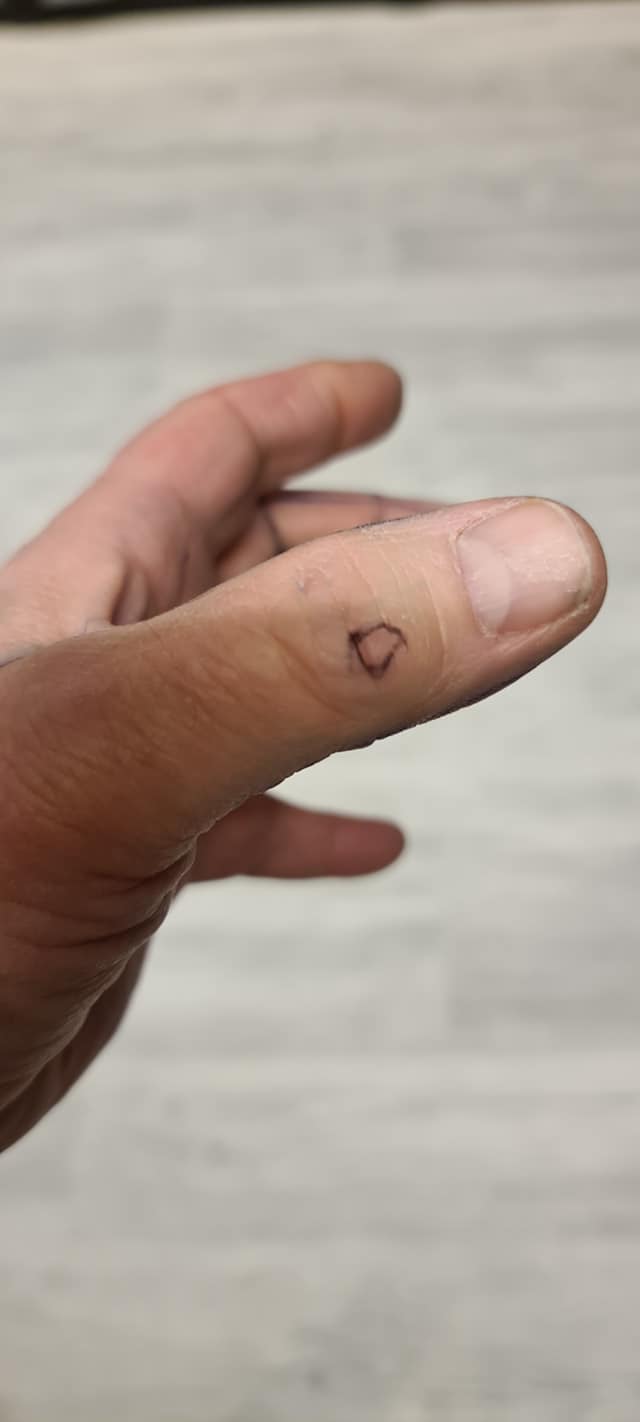
F. The last thing you do before sending the film to your ball driller. Draw on the thumb where it is widest. Draw two stretches on the thumb of each Grip-Guide while holding it between the long and the ring finger.
Short instructions for use for a trained ball drill. Read the short operating instructions above, watch the film and translate to the drilling method you usually use. If you need more training, contact www.stroms.biz
The instructions below are for a user who is completely novice and has no previous knowledge. If you work professionally with ball drilling and use Grip-Guide and may need conversion tables to translate the measurement into drilling instructions, you will find your instructions here.
Using the instructions below, a trained ball drill can then, easily translate your measurements to drill your ball, exactly to your hand. Applies to all types of grips. From the usual conventional grip, grip without thumb, regular fingertip, to the most advanced and modern grips with replaceable fingers and thumb inserts. Grip-Guide is easily translated to IT, Switch, Ultimate Grip-lock etc. systems. Ströms Bowlingshop has all types that are available. Stroms Grip-Guide works great without you having met.
Easiest if you get help from another person who can help you draw, take photos or film. But can be done yourself as well. The best and easiest is if you film when you use Grip-Guide. The film then shows if you did the right thing and a trained ball driller can easily read everything and you can completely ignore what the different numbers in inches mean.
There are two ways to hold the ball, conventional and fingertip.
CONVENTIONAL. Then you stop down middle and the ring finger down to the other joint, as you do on the balls you borrow in the hall. If you are measuring conventionally, draw lines on the second joint on both the ring finger and the middle finger.
FINGER TIP. Then you just stop down middle and the ring finger to the first joint. the thumb should always be in as far as possible at both the conventional and fingertip. If you are measuring fingertip, draw lines on the first joint on both the ring finger and the middle finger.
Instructions for Stroms Grip-Guide.
A. Draw help lines. Use an ink pen or a thin felt-tip pen. Draw straight lines, easier with a ruler or Grip-Guide edge. Draw lines on both the first and second lines of the fingers. Draw a line along both fingers, both on the side and on the inside. Draw lines on both sides along the thumb where the thumb is widest. If you have bumps or lumps on your fingers and thumb, mark them extra with a round ring. Here is a movie on all the lines you should draw.
B. Film as you stretch and bend your fingers and thumb as much as possible. This allows a trained ball driller to properly adjust your angles in the holes which is a combination of the flexibility of your fingers and the length between your thumb and fingers. Here are examples of film.
C1. CONVENTIONAL. Testing of ring and middle finger size, conventional grip.
Draw a line on the second line. Try Stroms Grip-Guide until the size where you can easily put your finger down until the line reaches the plexiglass. It should be easy, it should not be a problem and the finger should easily get all the way to the line you have drawn on the second joint. If you press, you should be able to cross the line with someone millimeter. Depends a bit on how strong your joints are. But it should be easy to get to the line. Do this on both the ring and the middle finger. Take photos or film (best) or write down the size.
C2. FINGER TIP. Testing the size of the ring and the middle finger, fingertip grip.
Draw lines on the first line. Try Stroms Grip-Guide until the size where you can easily put your finger down until the line reaches the plexiglass. It should be easy, it should not be a problem and the finger should easily get all the way to the line you have drawn on the first line. If you press, you should be able to cross the line with someone millimeter. Do this on both the ring and the middle finger. Take photos or film (best) or write down the size.
D. CONVENTIONAL AND FINGER TIP. Thumb size.
Same at your fingertips and conventional. Find a size where you can get your thumb through without any problems and completely without resistance. Turn the meter 90 degrees. Then you should be able to get your thumb with resistance because the hole is oval and narrower when you turn the ovality "wrong". You have the right size if it is easy as the oval of the hole corresponds to the thumb, but with some resistance when you turn the meter 90 degrees. Film (best) or write down this inch size. If you film, you just need to send the film and completely ignore writing down some measurements.
E. LENGTH
The same procedure for conventional and fingertip, but with the difference that you measure to the first joint line at the fingertip and the second joint line at conventional. Measure the length of both the middle and the ring finger.
Preparations. Draw a "plus" (+) at the bottom of the thumb crease. One line in the plus is parallel to the point and the thumb when you hold these fingers together around the meter. The second line in the plus, is drawn on the inside that follows the thumb and index finger. This "plus" (+), which is placed correctly at the bottom of the thumb crease, is what you start from and measure the length of the middle finger and ring finger.
The meter should rest against the hand to the respective finger. The green zero notch on the Grip-Guide should be in the plus at the bottom of the thumb crease and the fingers extended along the short side of Strom's Grip-Guide so you can read, or best, film, the length of the long and ring finger. Thumbs along the edge and extend your fingers. Stroms Grip-Guide's rounded short side should have contact with the inside of the hand all the way, no air between the Grip-Guide and the hand. Film, here you see examples. The length is measured in inches. Each line between inches is 1/8 part. So the line between 4 and 5 is 4 4/8, ie 4 1/2. That said, you do not need to be able to measure in inches, take photos or film.
F. Oval drilling angle of the thumb. Put the green zero line in the same way as you did when you measured the length. That is, put it at the bottom of the thumb crease where you have drawn a cross. You should now have the Grip-Guide between your middle and ring fingers. Draw along both sides of the Grip Guide. Now your ball driller can see the angle of your oval thumb and drill exactly as you were created. You see it at the end of the film here where all the elements are included.
Now everything is done! Sent the film to your ball driller and you will soon have a bowling ball that fits your hand perfectly.
Conclusion and a few words to the ball driller who will translate the customer's film.
The film you receive from the customer contains everything you need to know. Now you can translate to the drilling method you use. If you need extra help, there is an additional program for professional ball drills here.
By drawing on both the first and second joints, you will have both dimensions that can be used for conventional, two-handed or fingertip. That is, if the customer first wants conventional and then wants fingertips, you do not need to take new measurements. Everything is already on the movie the customer sent you. If the customer has followed the instructions, you can also in the future make two-handed and semi-tips etc. exotic grips. You have all the instructions needed for all types of grips.
Relaterade produkter
-
Ströms Bowlingshop
Stroms Grip-Guide. Professionella borrinstruktioner. Sv
495 kr -
Rea!
Ströms Bowlingshop
Spinner för bowlingklot
4 995 kr -

Presentkort
100 kr – 10 000 kr100 kr – 10 000 kr100 200 300 400 500 750 1000 1500 2000 2500 3000 3500 4000 4500 5000 6000 7000 8000 9000 10000This option is required